Wednesday, October 31, 2012

words of advice


Good morning. Gonna start this one with a picture of the Rusty Bucket Dog. If he's in the house or studio, he is never too far from me. He thinks I might scratch him behind the ears or toss him a rawhide chew treat. He's a sweetie and I kinda spoil him. 


Now wedding business. 

Remember the post about the advice box

Well using my mama's train case was determined as the way to go. But the B2B asked that the mirror be concealed. Not sure why, but I pondered it and here is what the process for this little lovely looked like. 

I love all things vintage and vintage in appearance. So I just happened to have in my stash some ALLEN + ROTH embossed paintable wallpaper that looks like old tin ceiling tiles. I picked this up at my local Lowe's

I cut it to the size I needed. 

Then started experimenting. 


I used Bronze Metallic and Tattered Leather Glimmer Mist. These are Tattered Angels products that I use for all kinds of things. I am slowly building my collection of the products, but they are wonderful and easy to work with. I first sprayed the wallpaper liberally with the tattered leather spray and dried it quickly with my heat gun. Then I sprayed in a random pattern with the bronze. 

I took old (almost dry) stamp pads in a dark brown, silver, and black and randomly swiped them across the raised portions of the pattern. 

Then a took a damp paper towel --- barely damp --- and swirled across the raised pattern, blending it all together. 

As the last step I misted lightly with Graphite Glimmer Mist and while it was still wet and using the same paper towel I buffed the raised pattern a little more. 

I LOVE THE OUTCOME.


I simply used double stick tape to cover the mirror with it. 

Then onto the next part. 

Remember when I made the fake typewriter keys. Well I finally used those last night. 

I made the little pennant banner for the advice box. 


There were fits and redo's (but no curse words) on this, but I am happy with this outcome too. 

I cut the larger pennant shapes from a dark teal paper. (note these are not large at all,  the paper was cut to a 3x21/2 inch rectangle.) 

Then smaller pennant shapes from assorted scraps. 

I punched scalloped borders from even more scraps. 

Glue it all together. Add the fake typewriter keys - some vintage buttons.

String it all on a wire with more buttons separating the pennants. 

Here's a detail


And the final shot.

The lace will most likely go away -- not sure yet what the final display will look like, but for now - it is marked off the to do list. 

I have to say - the faked typewriter keys and that embossed paper are pretty much a tie for favorite in this one. 

Have a happy Halloween -----


Tuesday, October 30, 2012

more accomplished

I took last Friday off to play with the Bride-to-Be. Let me just tell you out playtime was really really just hard work.

I shared the CAKE TABLE yesterday. That was finished on Friday. Then there was this also on Friday night. 

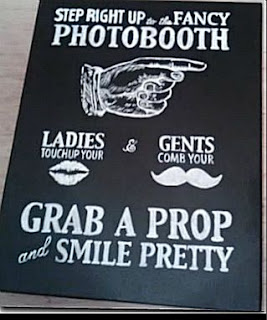
Molly ran a copy of a graphic she found online ---

Grabbed a sheet of transparency paper and my overhead projector and a black canvas I had painted.


Since so many of my surfaces are being used for various stages of projects for the wedding, she actually grabbed the dog's pillow and headed to the floor by the dining room island.

Using white paint and tiny brushes she lettered and lettered.


Not sure why, but the bandanna is required attire for her painting uniform.

Here is her result from three hours of being in the floor.


Props will be staged for our guests to use and a digital camera on a tripod. Knowing some of these guests, this should be fun.

A budget decision was to now rent chair covers along with the table linens. But she wants a pretty detail on the chairs, We got lots of paper (mama has a paper fetish) and using the same die set I punched 250 large hearts in solids and then 250 smaller ones in patterned papers.

Each of these will be punched in the center and added to the backs of the chairs with a tulle and ribbon bow.


Then there were some of these that I bought at the habitat thrift store ----

The ones I bought looked a lot like this .... corroded. Nasty. Rusted in spots.

I bought two with an idea to try --- (they were so bad, I only paid a dollar each)


The Man at My Address -- Father of the Bride took them apart and ripped out the electrical.

The only issue was that the backer mounting plate was riveted on and the rivets had to be drilled out to get those off.


Then, I scrubbed up the parts and outside we went to the "spray booth" (lest you think I am that well set up at my house, the spray booth in this case was an outdoor bench and a drop cloth). I used one of my favorites -- spray paint and coated them. I went back and forth doing other things while adding additional coats.


I cleaned the beveled glass panes.


Dug in the lace stash and found some I adore.

Then sprayed that lace with spray adhesive.


After giving that a few minutes to "set", I trimmed them at the edges. USE A NEW SHARP XACTO BLADE -just saying.


Aren't they pretty.

Then .....I reassembled all the parts.

And look ...... a table lantern.


Honestly, this turned out even better than I imagined it would

Just for smiles, I added a candle on Saturday night.

ANOTHER NOTE, FOR SAFETY REASONS (THIS GETS HOT IF THE CANDLE IS TOO BIG) USE ONLY A LITTLE TEALIGHT IN THESE. OR A LITTLE LED CANDLE IF IT WILL BE UNATTENDED.

I'm loving this one too.

This was not inspired by a pin, but I hope it inspires someone.


Monday, October 29, 2012

I blame it on pinterest.

Look past the cute little heart suckers.

See the grungy work table. A scavenged piece from a throwaway pile. Dumpster diving monstrosity. Literally disintegrating. 


Now look -- the same table on my front porch - still a work table but with a nice new -AND ALSO FREE -- top. 

Crusty Old Guy has a friend who owns a cabinet shop. Cabinet lumber comes on some NICE pallets with plywood tops on them and he snagged several pallets and took them apart for the plywood. 

So a few screws some rounded edges and sanding and we have a nice solid tabletop. 


Here is where pinterest and my go to learning source Google step in. 

I made a fitted top for the table out of a flat white sheet. 

Then made side panels from some opaque white fabric. 

Then I started the whole stitching and cussing part. 

(Note - cute little reading glasses now required) 

There is no gathering foot attachment for my machine. But I learned a neat trick. Zigzag across dental floss to gather the tulle. If you hold the floss under tension, it kinda gathers itself. 

On the first one i was like "HEY HEY - this is waaay cool" 


I broke threads. And I cussed. I rethreaded the needle again and I cussed. Actually, I used up all of my cuss words for the weekend on this little project. 


As I gathered the tulle, I spread it out along the table top. I was trying to judge when enough was enough. 

Honestly after that second piece -- I had had enough.


Little did I know that the REAL fun was only beginning. And that I would need to "borrow" curse words from everyone's allocation.

I started adding this mountain to the edge of the table cloth along with the solid draped sides. 


After wrangling and using up several of those words, I managed to completely encase the table as needed. I then added beautiful lace top. 

It all fit and the look was like I wanted. 


For the next step, I drilled holes for cup hooks and screwed those in on three sides. Our table goes against the wall so there will be no need on the back. 


Flip the table back over and hang some icicle lights from the hooks. 

Add the now fitted tablecloth and lace topper and then turn the lights out and hope that there will not be the "Mom, I don't like it" look on the Bride-to-Be's face. 


Plug in those lights ------


I am such a happy girl.    

I think it it a reasonable duplication of this ....

Source: dogpile.com via Teresa on Pinterest


One lit party table --- rental. $75.00

ours -- table = free
fabric = sheet from the stash 
tulle = 10.00
lights = 6.00

curse words by mama --- absolutely no charge. 

so for 16.00 I own the table and the cloths. can use it as often as I want - loan it out or even rent it out my self. 


I'm going with this one being a real score.

There was a ton more completed this weekend ---

Til tomorrow.

Teresa


Tuesday, October 23, 2012

JUST FOR FUN

LATE 70'S TO EARLY 80'S ---- I THINK??

THIS IS ME AND AN EXCHANGE STUDENT NAMED BERTA -- AT THE CHURCH I GREW UP IN.

I ABSOLUTELY LOVED THAT PLAID SKIRT. 

I WAS TINY LIKE MY GIRLS ARE NOW.


AT SOME TIME IN THOSE YEARS BACK --- THIS IS MY MAMA.

THERE ARE RUMORS THAT I LOOK A LITTLE BIT LIKE HER......


I LOVED THAT PLAID SKIRT SHE HAS ON IN THIS PICTURE TOO.


WHAT DO YOU GUYS THINK -- DO I LOOK LIKE MY MAMA?


Monday, October 22, 2012

wedding wedding party too


There was a sweet wedding --- congratulations Holly and Dylan

There was a Halloween Party --- with littles, and mediums, and big ones too. Lots of laughter and boiled peanuts too.


I worked on the blue table runners. I had lots of great help.


She held down the fabric for me.


And did a ton of quality control inspections.


This one is my favorite --- it is the last one.


There was some painting --- this old rocker bench bought at a flea market years ago. It used to be red.


The Father of the Bride spent some time in the fall sunshine with the bench and a paintbrush,  painting the bench a soft pale blue.


I used some letters from Michaels.


Glued this fun glitter paper to them.


After the glue dried, I trimmed them up.


Drilled holes in them.


Took them to the porch studio and sanded the rough edges of the paper off.

I tried stringing them on ribbon but they didn't hang like I thought they should. ( the "M" was heavier than the "R" )

Step back and think.


Restring with fine gauge wire and pearl beads.


Stretch them out across the bride groom bench seat (yes that is an unexplained hole in the bench. it doesn't impact the comfort of sitting there so we left it.)

Then make some fluffs using tulle and a couple of melty flowers in the center.


Put it all together and you have this cute little two person vintage rocker bench for the Bridal table at the reception.


In addition to those accomplishments -- the wedding dress first fitting was completed -- the bridesmaids dresses selected and all have been ordered (37.00 per dress from Kohls).

EDIT - I am adding the link to this post for Kohl's dress section on their website. 

http://www.kohls.com/catalog/women-dresses.jsp

A very nice email came from  in reference to this post from Kohl's and I am happy to say they have offered my readers (and me) a discount code for online purchases. 
Here is the information for that.
, I also wanted to share with you the new exclusive 10% off code for kohls.com. You can share code TENBLOG now through December 29th. It can be used to stack savings with one other code as well. Feel free to share it with your readers! 


It was a very good weekend.

another edit -- I've already been asked this is the link to the dresses we picked.

Wednesday, October 17, 2012

It's the copper top one.

A long long time ago, I was the Bride. But that is not what this post is about. 

Kinda not.

It is relevant ---- 27 years ago I was the Bride. October 12, 1985. A beautiful church. Full of family and friends. And I had a cool-a$$ bouquet for the times. Done in silks around a base of glass flowers that lit up when a switch on a battery pack was flipped (actually is was a slide switch) You can barely see the little lights in the photo above. 

Wedding over ---- settle in ---- pack bouquet in a shoebox ---- yeah I was really very sentimental. Move and move again. Shuffle box. You've got the picture. 

The wedding dress was bagged, along with the veil which was torn at the reception. The decision has been made to use the veil for some things in this wedding (still up for debate at this time). So I went on a search mission in the house for the dress and veil. 

Cedar Chest --- nope.

Attic storage --- nope.

Mama's house --- nope. 

Well --- we have these two cabinets that we built in years ago above our closets. High ceilings - high cabinet - ladder required. The Man at my Address brought in the ladder and I climb to look. Low and behold there is the bag and this box. I literally said out loud "what the crap could be in there".

I opened this shoe box and it is my bouquet. So I get it down too to see if there might be pieces she can use out of it.

I had stored it without taking the batteries out of it some twenty seven years ago. (THIS IS A HUGE NO-NO) 

But the battery pack was in good shape. 


Standing there in my bedroom holding this, I have that moment where I just had to know -----

Wonder if I turn this on, will it still work? No way in hell after this many years. 

So I slide the switch and flip the bouquet over ------

THE DAMNED THING LIT UP. 

Yes it did --- I could not believe it. 

Of course I took pictures. 


The entire thing still worked. 

How cool is that? 


Needless to say, I'm a DURACELL battery fan for sure now. 

This was a just for fun post today, but hey it was pretty cool wasn't it. 

Have a wonderful one -- 

PS - I'm sending this post via email to Duracell. Hope they think it as cool as I do.