
The view of the track --- from the parking lot. I went prepared. Layers of clothing. Which we came out of when we went into the weight room. Just for the record, I am really ready to have some pretty weather. The weather induced migraine has me cranky and very irritable.
 Several weeks ago, my altered clipboard tutorial caught the attention of the manufacturer of the boards that I used. A link was posted to my blog from their facebook page. In following up with that scenario, I discovered a link to the UHU Glues blog. The send out a free sample kit for product review every month. I applied for the december sample kit and was granted one.
 The sample included a full size bottle of TWIST AND GLUE, flat glass floral marbles, and magnets. I have used UHU GLUE STICKS before, but was unfamiliar with the TWIST AND GLUE.
 Like always, I set up a tray and pondered my project.
 Then I ran across these. Decorative ornament hooks. I found mine at a discount store. As quick as I saw these, I knew I wanted to do a variation of the traditional glass magnet.
 Then I ran across these. Decorative ornament hooks. I found mine at a discount store. As quick as I saw these, I knew I wanted to do a variation of the traditional glass magnet.
 Here is the process I used. I'll also include product review notes as we go.
First - gather your stuff. Scissors, papers, glass marbles, magnets, TWIST AND GLUE, ornament hooks.
 Since all the marbles are slighly different, I placed a marble on my image and outlined it with a pen.
 Then I trimmed (and trimmed, and trimmed) until it fit the back of the marble with no excess hanging out. Other people glue then trim with a blade once the glue dries, but this way works for me.
 Apply the TWIST AND GLUE to the paper circle and apply to the back of the marble. I had a few bubbles in my glue, but I simply pushed those out with my fingers.
 Apply the TWIST AND GLUE to the magnet and set the paper covered marble on top of it. See the magnet drying in the background of this picture and the photo below. This will eliminate the magnet sliding around before the glue sets up.
 I assembled mine on a small bamboo cutting board so I can set it aside to dry.
 Now wait for these to dry --- I left mine over night.
 Turn the magnet over face down and slide the hook end around the magnet. Some of mine needed just a little persuasion with the pliers to be a snug fit. My hooks are metal and plenty snug enough to not need additional glue, but you could add a drop if you like.
First - gather your stuff. Scissors, papers, glass marbles, magnets, TWIST AND GLUE, ornament hooks.
 Since all the marbles are slighly different, I placed a marble on my image and outlined it with a pen.
 Then I trimmed (and trimmed, and trimmed) until it fit the back of the marble with no excess hanging out. Other people glue then trim with a blade once the glue dries, but this way works for me.
 Apply the TWIST AND GLUE to the paper circle and apply to the back of the marble. I had a few bubbles in my glue, but I simply pushed those out with my fingers.
 Product review note -- I have made several things using these glass marbles and this is a great product. None of my paper buckled on the glass and the glue dried completely clear. The only thing I had any issue with was a very porous handmade paper and the glue made a bleed through spot on the paper. I suspected that it would, so I tested it first.
 Apply the TWIST AND GLUE to the magnet and set the paper covered marble on top of it. See the magnet drying in the background of this picture and the photo below. This will eliminate the magnet sliding around before the glue sets up.
 I assembled mine on a small bamboo cutting board so I can set it aside to dry.
  Now wait for these to dry --- I left mine over night.
 Product review note. The glue dries completly clear. Love that. Again I also like that none of my paper buckled in anyway with this glue.
Now for the fun part - my twist on these
 Turn the magnet over face down and slide the hook end around the magnet. Some of mine needed just a little persuasion with the pliers to be a snug fit. My hooks are metal and plenty snug enough to not need additional glue, but you could add a drop if you like.
 Now flip them over and look ------ Note holders.
I made mine to coordinate with the clipboards that I made before. I use my clipboard for the grocery list and I plan to clip my coupons to the spiral.
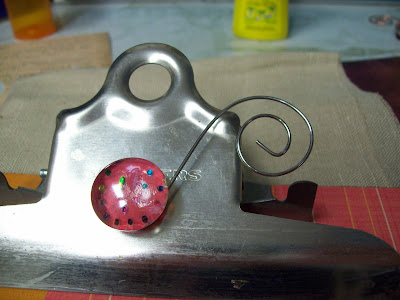
 See how the note holder works.

I made mine to coordinate with the clipboards that I made before. I use my clipboard for the grocery list and I plan to clip my coupons to the spiral.

 See how the note holder works.
This last one stayed on the fridge for about 45 seconds before the College Girl grabbed it for her dorm room.
Product notes ---UHU TWIST AND GLUE has just become my go to glue for these paper to glass projects. I alos tried it on a few paper gift tags and loved it for that application as well. Thank you UHU for sending my free sample kit to review.
Now if anyone out there makes a modification style magnet, plase leave a comment and let me know.
Have a wonderful day.

No comments:
Post a Comment